Silk Camera Path Tool
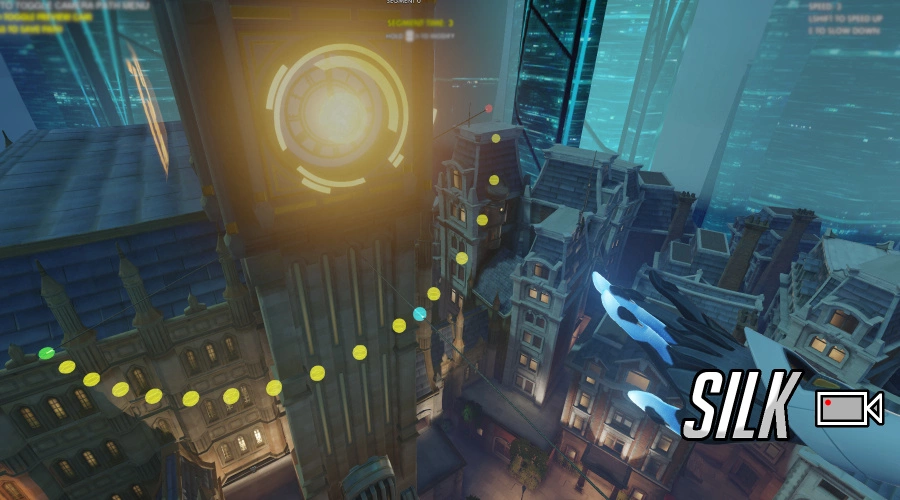
View original size
Controls
- [Primary Fire] {Short Press}: Set position of current camera value
- [Primary Fire] {Long Press}: Set position of current camera value and start moving it forward
- [Secondary Fire]: Next camera value
- [Melee]: Control camera speed
- [Reload]: Toggle camera path menu
- [Ultimate] {Short Press}: Preview camera path
- [Ultimate] {Long Press}: Save camera path
- [Interact] {Short Press}: Toggle noclip
- [Interact] {Long Press}: Teleport to selected camera value
- [Ability 1]: Speed up noclip
- [Ability 2]: Slow down noclip
How To Create A Camera Path
- There are 4 camera values to cycle through with Secondary Fire: Start Position (required), Midpoint, End Position (required), and Facing Toward.
- Select the location for your currently selected camera value with Primary Fire, or press and hold if you want the position to start moving forward after its initial placement.
- A segment is composed of a Start Position and an End Position. Adding a Midpoint will generate an arc that tries to pass through the selected position.
- The Facing Toward value can be used to set the position the camera is looking at during the segment. If not set, the camera will look at the last End Position in your camera path.
- There are three different behavior types you can set the Facing Toward value to. Absolute: During this segment, the camera will always be facing the Facing Toward position. Transform: The camera will start out looking at the Facing Toward position, but by the end will be looking at the next segment's Facing Toward position. Event Player: The camera will ignore the Facing Toward value and instead look at the player that is in the camera.
- The default time it takes the camera to complete a segment is 3 seconds. This can be changed by holding Melee. While held, press Primary Fire to decrease and Secondary Fire to increase the time by 1 second. Hold Jump to instead change by 0.1 seconds. Hold Crouch to instead change by 5 seconds.
Reload Menu Options
- Switch Active Camera Path Segment: Switches focus to the next segment in your path.
- Add Camera Path Segment: Adds a new segment to your camera path.
- Change Facing Toward Behavior: Switches between three different behaviors for the facing position of the active segment.
- Undo Last Change To (Selected Camera Value): Will undo the last change you made to the currently selected camera value.
- Delete (Selected Camera Value): Deletes the currently selected camera value.
- Delete Last Segment: Removes the last segment from your camera path.
- Delete Entire Path: Removes all segments from your camera path.
- Switch Active Camera: Switches focus between currently active camera and previous ones you have saved.
Saving And Exporting Camera Paths
- Once you're satisfied with your camera path, press and hold Ultimate to save it. This will automatically load up a new camera path for you to work on.
- When you're done creating camera paths, or you just want to save your progress (or switch maps), you're ready to export. Do so by opening the workshop inspector and changing the variable target to GLOBAL. Then, press the (X) button (when hovered over, it says "copy to clipboard current variables for current variable target as workshop actions"). Open a text file and paste the actions in.
- Delete the first 6 lines you just pasted, so the top line of the file is the word "actions". Save the text file, and you're good to go. Your cameras will be lost if you leave the game or go back to the lobby before following these steps!
Importing Camera Paths
- Copy the rules from the Code Snippet, and paste them into your mode. Note: You will need player variables 122-127 free, as well as global variable 127 and subroutine 127. To resolve conflicts with variable/subroutine numbers, simply change the numbers before pasting them into your mode. Just make sure none of the numbers are in use by your mode already, and none exceed 127.
- Open the rule that is titled Import Camera Paths Here and paste in the actions you saved in the text file. Alternatively, if you already have an Ongoing - Global rule with no conditions, you can paste the camera paths there instead.
- To get back to editing a previously exported set of cameras, all you need to do is open the top rule of Silk called Global Init (Import Camera Paths Here), and paste the actions in. When you start up the game you will be on a new camera, but you can switch to your old cameras through the reload menu.
Using Cameras In Your Mode
- To activate a camera for a player call the subroutine ActivateSilkCamera. Note: Don't call this subroutine from a global rule, as it requires an event player.
- There is a player variable called SilkVars that contains a few values that are usable by the workshop author. None of the other variables should ever be used.
- To change which camera will be used by the player, change that player's SilkVars[0]. For example, SilkVars[0] = 0 will use camera 0, or the first camera you saved. SilkVars[0] = 1 will use the second camera you saved, etc.
- To change the end delay after the camera has completed its path before the view switches back to the player's, change the player's SilkVars[1]. For example, SilkVars[1] = 0 will mean no delay. SilkVars[1] = 2 will mean a 2 second delay, etc.
- SilkVars[2] should not be modified but is accessible to check if the player is currently in a camera. It will evaluate to TRUE if so, and FALSE if not.
- An example is given in the Code Snippet for how to activate a camera.
Disclaimer
I originally started creating this mode for myself, since I needed a way to generate arcing camera paths. Because I like to overdo everything, I ended up spending a few weeks turning it into this. It is very possible that there are bugs. If you find one, please let me know about it and I'll see what I can do. Also, yes, the camera speeds up as it approaches the end of each segment. This mode was made as a quick and dirty way to generate camera arcs, and I'm not sure if it's possible to fix given the way the arcs are generated. It's still possible to work with and smooth out the speed transitions by tweaking the segment time if you want to put in enough effort.
Credit
CactusPuppy for help with math
Players |
1 - 1
Categories:
Tools,
Miscellaneous
Heroes:
Echo
Created at:
Last updated:
Current version:
1.1
Share URL:
https://workshop.codes/silkcam
Source code
Loading...