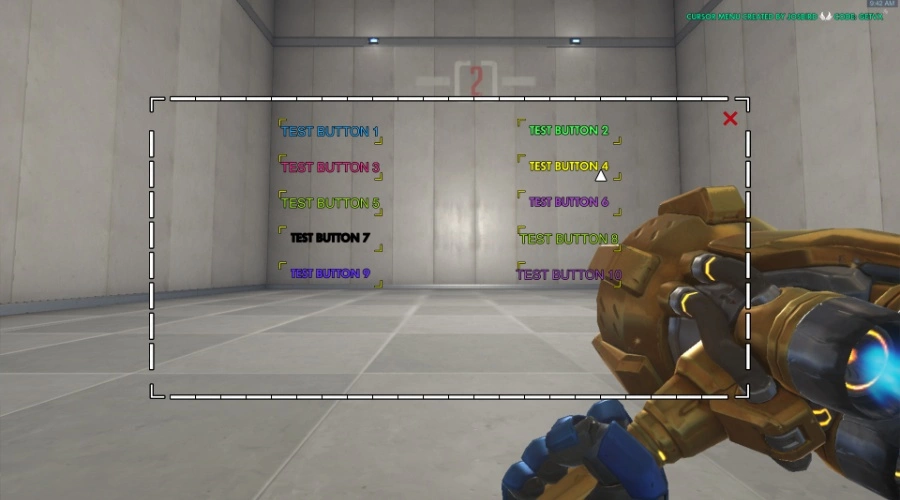
Josbird's Cursor Menu
This code is over 6 months old. The code may have expired and might no longer function.

Note 8/Sept/2023: It's been a long time since I worked on this! I've tried and failed to start working on an update multiple times, but I still want to do it someday. For the time being, if you have questions, you can contact me on Discord at @josbird as mentioned at the bottom of the description. I can't guarantee I'll remember all the details of how it works, but I'll do my best to help!
Welcome to Josbird's Cursor Menu!
NEW UPDATE: VERSION 1.1! Many improvements over version 1.0. See update log for major details. New quick guide below!
Note: if you need to make changes to a mode that still uses the 1.0 version of Josbird's Cursor Menu, I've converted and saved the old guide here.
Table of contents
- The basic structure of a button
- Creating a button
- Destroying a menu button
- Detecting button presses
- Modifying buttons
- Getting the properties of an existing button
- Workshop Settings
- Considerations for the Workshop's 128 texts limit
- Planned features
- Update log
The basic structure of a button
Each button is defined by an array with 13 values, as described in the following table:
| Array Index | Value | Type | Description |
|---|---|---|---|
| 0 | Label text | String | The actual text shown by the button. |
| 1 | Primary Action ID | Any | The player variable currActionID becomes equal to this value when the button is clicked with primary fire. Can be a string, number, or any other unique identifier you can think of. |
| 2 | Secondary Action ID | Any | Same as above, but for secondary fire. |
| 3 | Scale | Number | The size of the button text. Uses the same scale system as any other In-World Text. Maximum is 4. |
| 4 | Position X | Number | The x coordinate of the button on the menu in screen units. By default, the center of the menu is at X = 0, and the bounds are ±2.5. Positive direction is towards the right of the screen. |
| 5 | Position Y | Number | The y coordinate of the button on the menu in screen units. By default, the center of the menu is at Y = 0, and the bounds are ±1.25. Positive direction is towards the top of the screen. |
| 6 | Click width | Number | The width of the clickable area of the button in screen units. |
| 7 | Click height | Number | The height of the clickable area of the button in screen units. |
| 8 | Default color | Color | The color of the button when the cursor is not hovering over it, or when it is non-clickable. Can be a Custom Color. |
| 9 | Hover color | Color | The color of the button when the cursor is hovering over it, indicating it can be clicked. Can be a Custom Color. |
| 10 | Use alternate font | Boolean (true or false) | If set to true, the script will force the button to use the alternate, thinner font for In-World Texts. Note that if you have certain characters in the label text, the button may render as the alternate font even with this value set to false. |
| 11 | Button is clickable | Boolean | If set to false, the button will not be clickable and the hover color will not be used. Useful for making menu labels. |
| 12 | Button is visible | Boolean | If set to false, the button will not be rendered. Useful for hiding buttons to save text budget without destroying the button entirely. |
In order to assist with sizing click areas, I recommend turning on Debug Mode in the Workshop Settings menu during development.
Creating a button
As of version 1.1, creating a button works similarly to (for example) Create Effect or Create HUD Text. Buttons persist between openings of the menu, and exist in a per-player context.
To create a button at any time during your script, do the following:
- Set the player variable
newButtonequal to the properties you want the new button to have, according to the properties listed in the table above. - Use
Call Subroutineto run thecreateMenuButtonsubroutine. - The button will be created.
- After running the subroutine, the player variable
lastMenuButtonIDwill contain the ID of the button you just created, similar toLast Created EntityorLast Text ID. To store the button for later modification, save the contents oflastMenuButtonIDto another variable.
Example
In this example, I want to create a button that fully charges the player's ultimate. The label text will be "Fill ultimate" and the primary action ID will be "ult". I'll leave the secondary action ID blank as I want this button to only function on a left click. The button will be positioned at the top center of the menu and will be relatively large. I also like how the alternate font looks, so I'll enable it.
Once the button is created, I'll store its ID in the "UltimateButton" player variable.
rule("Create ultimate button")
{
    event
    {
        Ongoing - Each Player;
        All;
        All;
    }

    conditions
    {
        Has Spawned(Event Player) == True;
    }

    actions
    {
        Event Player.newButton = Array(Custom String("Fill Ultimate"), Custom String("ult"), Null, 3, 0, 1, 1, 0.300, Color(Aqua), Color(
            Yellow), True, True, True);
        Call Subroutine(createMenuButton);
        Event Player.UltimateButton = Event Player.lastMenuButtonID;
    }
}
Note that these properties are stored in an internal array, so they do not update unless the array itself is updated. This means that any time you want to change the text, size, position, or any other property of a button while the menu is open, you must use the modifyMenuButton subroutine as detailed in Modifying a button.
Destroying a menu button
As of version 1.1, creating a button works similarly to (for example) Destroy Effect or Destroy Icon. You will need to have a valid button ID obtained from saving the value of lastMenuButtonID after creating a button, in order to destroy the button corresponding to that ID. To destroy an existing button at any time during your script, do the following:
- Set the player variable
destroyButtonIDequal to the ID of the button you want to destroy. - Use
Call Subroutineto run thedestroyMenuButtonsubroutine. - The button will be destroyed. No additional actions are necessary.
If there is an issue with the ID passed to destroyMenuButton, the subroutine will log an error to the inspector.
Example
As a continuation of the previous example, I'll destroy the "Fill Ultimate" button when the player presses melee. The button's ID is stored in UltimateButton.
rule("Destroy ultimate button")
{
    event
    {
        Ongoing - Each Player;
        All;
        All;
    }

    conditions
    {
        Is Button Held(Event Player, Button(Melee)) == True;
    }

    actions
    {
        Event Player.destroyButtonID = Event Player.UltimateButton;
        Call Subroutine(destroyMenuButton);
    }
}Detecting button presses
As stated in the basic structure of a button, whenever a button is clicked, the currActionID variable is set equal to that button's Action ID for up to one server tick. Using this, you can detect button presses by setting up a rule that checks when currActionID is equal to the desired action.
Example
Continuing again from the previous example, I want my Fill Ultimate button to give the player 100% ult charge. I'll listen for the action ID "ult" by having the condition check if currActionID is equal to "ult", and if so, set the player's ultimate charge and have them communicate Thanks.
rule("Fill ultimate charge")
{
    event
    {
        Ongoing - Each Player;
        All;
        All;
    }

    conditions
    {
        Event Player.currActionID == Custom String("ult");
    }

    actions
    {
        Set Ultimate Charge(Event Player, 100);
        Communicate(Event Player, Thanks);
    }
}
Keep in mind that an Action ID does not have to be a Custom String. If I wanted to have a variety of buttons that did a similar action, but with a different value for each one, I could set those buttons' action IDs to, say, a number between 101 and 109. Then I could use one rule whose conditions check that the ID is within that range, then subtracts 100, and now I can perform some action based on that "argument" of a number from 1 to 9. An action ID could even be an array, with the first index determining the action type and the rest of the indices indicating multiple arguments!
Modifying buttons
The properties of a button are stored internally by the script in an array. For this reason, buttons are not capable of reevaluation the same way a normal workshop effect or text is. However, buttons are not entirely static, and can be modified as detailed below.
As of version 1.1, modifying the properties of a button is handled internally. You will need to have a valid button ID obtained from saving the value of lastMenuButtonID after creating a button, in order to modify the button corresponding to that ID. You will also need the index of each property you want to change according to the table in the basic structure of a button, as well as a value you want to change that property to. Then you must do the following:
Set the player variable
buttonModificationto an array containing the following values:Array Index Value 0 The ID of the button to be modified 1 The index of the first property to be changed 2 The new value of the corresponding property 3+ (Optional) Additional index-value pairs for other properties you want to change Use
Call Subroutineto run themodifyMenuButtonsubroutine.The button will be modified. No additional actions are necessary.
If there is an issue with the arguments passed to modifyMenuButton, the subroutine will log an error to the inspector.
Note that scale does not reevaluate in In-World Texts. To resize a button, you must toggle its visibility after modifying its size.
Example
In this example, I'll let the player move the Fill Ultimate button from the previous example from (0,1) to the center of the screen at (0,0) by pressing melee. This means I simply need to change the position Y value (index 5) to 0.
rule("Move ultimate button")
{
    event
    {
        Ongoing - Each Player;
        All;
        All;
    }

    conditions
    {
        Is Button Held(Event Player, Button(Melee)) == True;
    }

    actions
    {
        Event Player.buttonModification = Array(Event Player.UltimateButton, 5, 0);
        Call Subroutine(modifyMenuButton);
    }
}Getting the properties of an existing button
Sometimes, you may want to modify a button property based on its previous value instead of replacing it entirely. In this case, you can use getButtonProperties to get a copy of the button's properties array, which you can then use to find the current value of a specific property, modify it, then pass back to modifyMenuButton.
- Set the player variable
getPropertiesequal to the ID of the button whose properties you want to retrieve. - Use
Call Subroutineto run thegetButtonPropertiessubroutine. - After running the subroutine, the player variable
getPropertieswill be replaced with an array corresponding to the properties of the button, according to the table in the basic structure of a button.
Example
In this example, I'll have the Fill Ultimate button from the previous examples show its action ID when the player presses melee by sending them a small message.
rule("Get ultimate button action ID")
{
    event
    {
        Ongoing - Each Player;
        All;
        All;
    }

    conditions
    {
        Is Button Held(Event Player, Button(Melee)) == True;
    }

    actions
    {
        Event Player.getProperties = Event Player.UltimateButton;
        Call Subroutine(getButtonProperties);
        Small Message(Event Player, Custom String("Fill Ultimate button's action ID: '{0}'", Event Player.getProperties[1]));
    }
}
Workshop Settings
With version 1.1, I've included several Workshop Settings that can help you build the menu you want.
Category
Setting
Description
Default
Josbird's Cursor Menu
Menu Width
The width of the menu in screen units. I don't recommend going bigger than this as parts of the menu may be hidden for users playing on very low FoVs.
5
Josbird's Cursor Menu
Menu Height
The height of the menu in screen units. I don't recommend going bigger than this as parts of the menu may be hidden for users playing on very low FoVs.
2.5
Josbird's Cursor Menu
Button Click Sounds
Determines whether buttons will produce a sound at the player's position when clicked.
On
Josbird's Cursor Menu
Debug Mode
Shows click areas for buttons that are currently clickable. Make sure to turn this off when you're done creating the menu, as the click area texts will use a significant amount of the text budget.
Off
Josbird's Cursor Menu
Menu Prompt HUD
When enabled, players not in the menu will see a HUD at the top of their screen telling them to press interact to open the menu.
On
Josbird's Cursor Menu
Loading HUD
When enabled, the menu will attempt to show a HUD indicating that it is loading. May be misleading for menus that load quickly, or not show up for menus that take several seconds to load.
On
Josbird's Cursor Menu
Menu Disables Game HUD
When enabled, opening the menu will hide all native HUD elements on the player's screen, and closing it will show them again.
On
Extra
Server Load HUD
Creates a simple HUD text on game start displaying server load to the host player in the top right corner. Left this in since it might be quicker than making your own if you're starting work on a game mode.
Off
Considerations for the Workshop's 128 texts limit
Version 1.1 includes a global variable named textBudget. It starts at 128, and as the menu script creates and destroys In-World Texts and HUD Texts, it subtracts from or adds to that number to track the total remaining text budget.
You may find it useful to include any texts that you create in your own script in this count. To do this, simply add a Modify Global Variable(textBudget, Subtract, 1) action after every create in-world text or HUD text action, and a Modify Global Variable(textBudget, Add, 1) action after every destroy in-world text or HUD text action.
In addition to this tool, here is some information that may be useful when planning your menu contents:
- The menu frame uses 8 IWTs (In-World Texts) per player: 4 for each edge and 4 for each corner.
- An easy way to free up space in the text budget without hurting the look of the menu much is to remove the edges of the frame. You can do this by disabling the
Create menu border edges rule
- If you also need to remove the corners, you can disable the
Create menu border corners rule.
- The exit button in the top right button uses an Icon rather than an in-world text, so it'll contribute to the effects budget limit instead of the text budget.
- Each player's cursor uses 2 IWTs that alternate visibility in order to make sure the cursor always renders on top of other menu elements.
- Each button uses 1 IWT per player, and only when visible.
- If you are in debug mode, each button uses an additional 2 IWTs per player.
- The menu prompt HUD and server load HUD are both persistent, and only take 1 each out of the text budget of the entire game.
- The loading HUD uses one IWT per player, but only appears for a short time while that player is opening the menu.
Planned features
- Workshop Settings options to remove individual parts of the frame more easily and without having to disable rules
- The ability to disable the menu exit button
- Workshop Settings options to change or disable the menu opening method
- A Workshop Settings option for a HUD that shows the value of the
textBudget variable
- Automatic click area sizing based on the contents of the button's label text
- This is more complicated than it sounds :(
- A globalized verison of this script that renders at a specific world position in order to save text budget
- A fully featured genericized version of the script that can be imported in OSTW
- Fix debug mode so click areas are updated if the menu changes while it's open
Still have questions? Feel free to contact me on Discord at @josbird. Make sure to mention you came from here so I know you're not a spam account!
Source code
Loading...